Clusterward
Getting started

Getting started: six steps to your first deployment

Clusterward runs as SaaS. There’s nothing to install – all you need is a Scaleway project, an IAM key and a repository with a Dockerfile. This guide takes you from the demo appointment to your first application with a database, domain and alert channel.

Requirements

Before you start

Everything Clusterward creates is created in your own Scaleway project. So create a project in advance that belongs to Clusterward alone, and generate an IAM key in it. You won’t need a domain until step five, or a repository with a Dockerfile until step four. With a provisioned cluster, the whole process takes about thirty minutes, most of which is spent waiting for Scaleway.

  • Scaleway project

    A dedicated project for Clusterward, so that costs and permissions are cleanly separated.

  • The project’s IAM key

    With the permissions from the table below; “Test” checks them before saving.

  • Repository with Dockerfile

    Or a ready-made image in a registry, or a Helm chart.

  • Optional: a domain

    At Cloudflare, if you want records to be created automatically; otherwise you create the record yourself.

At a glance

Duration
About 30 minutes, 10 to 15 of them waiting for Scaleway
Installation
None, Clusterward is SaaS
Costs
Clusterward from €99 per month, Scaleway based on usage
Result
An application with a database, domain, certificate and alerts
Undo
Teardown removes exactly what was created
Step 1 · 30 minutes

Demo and workspace

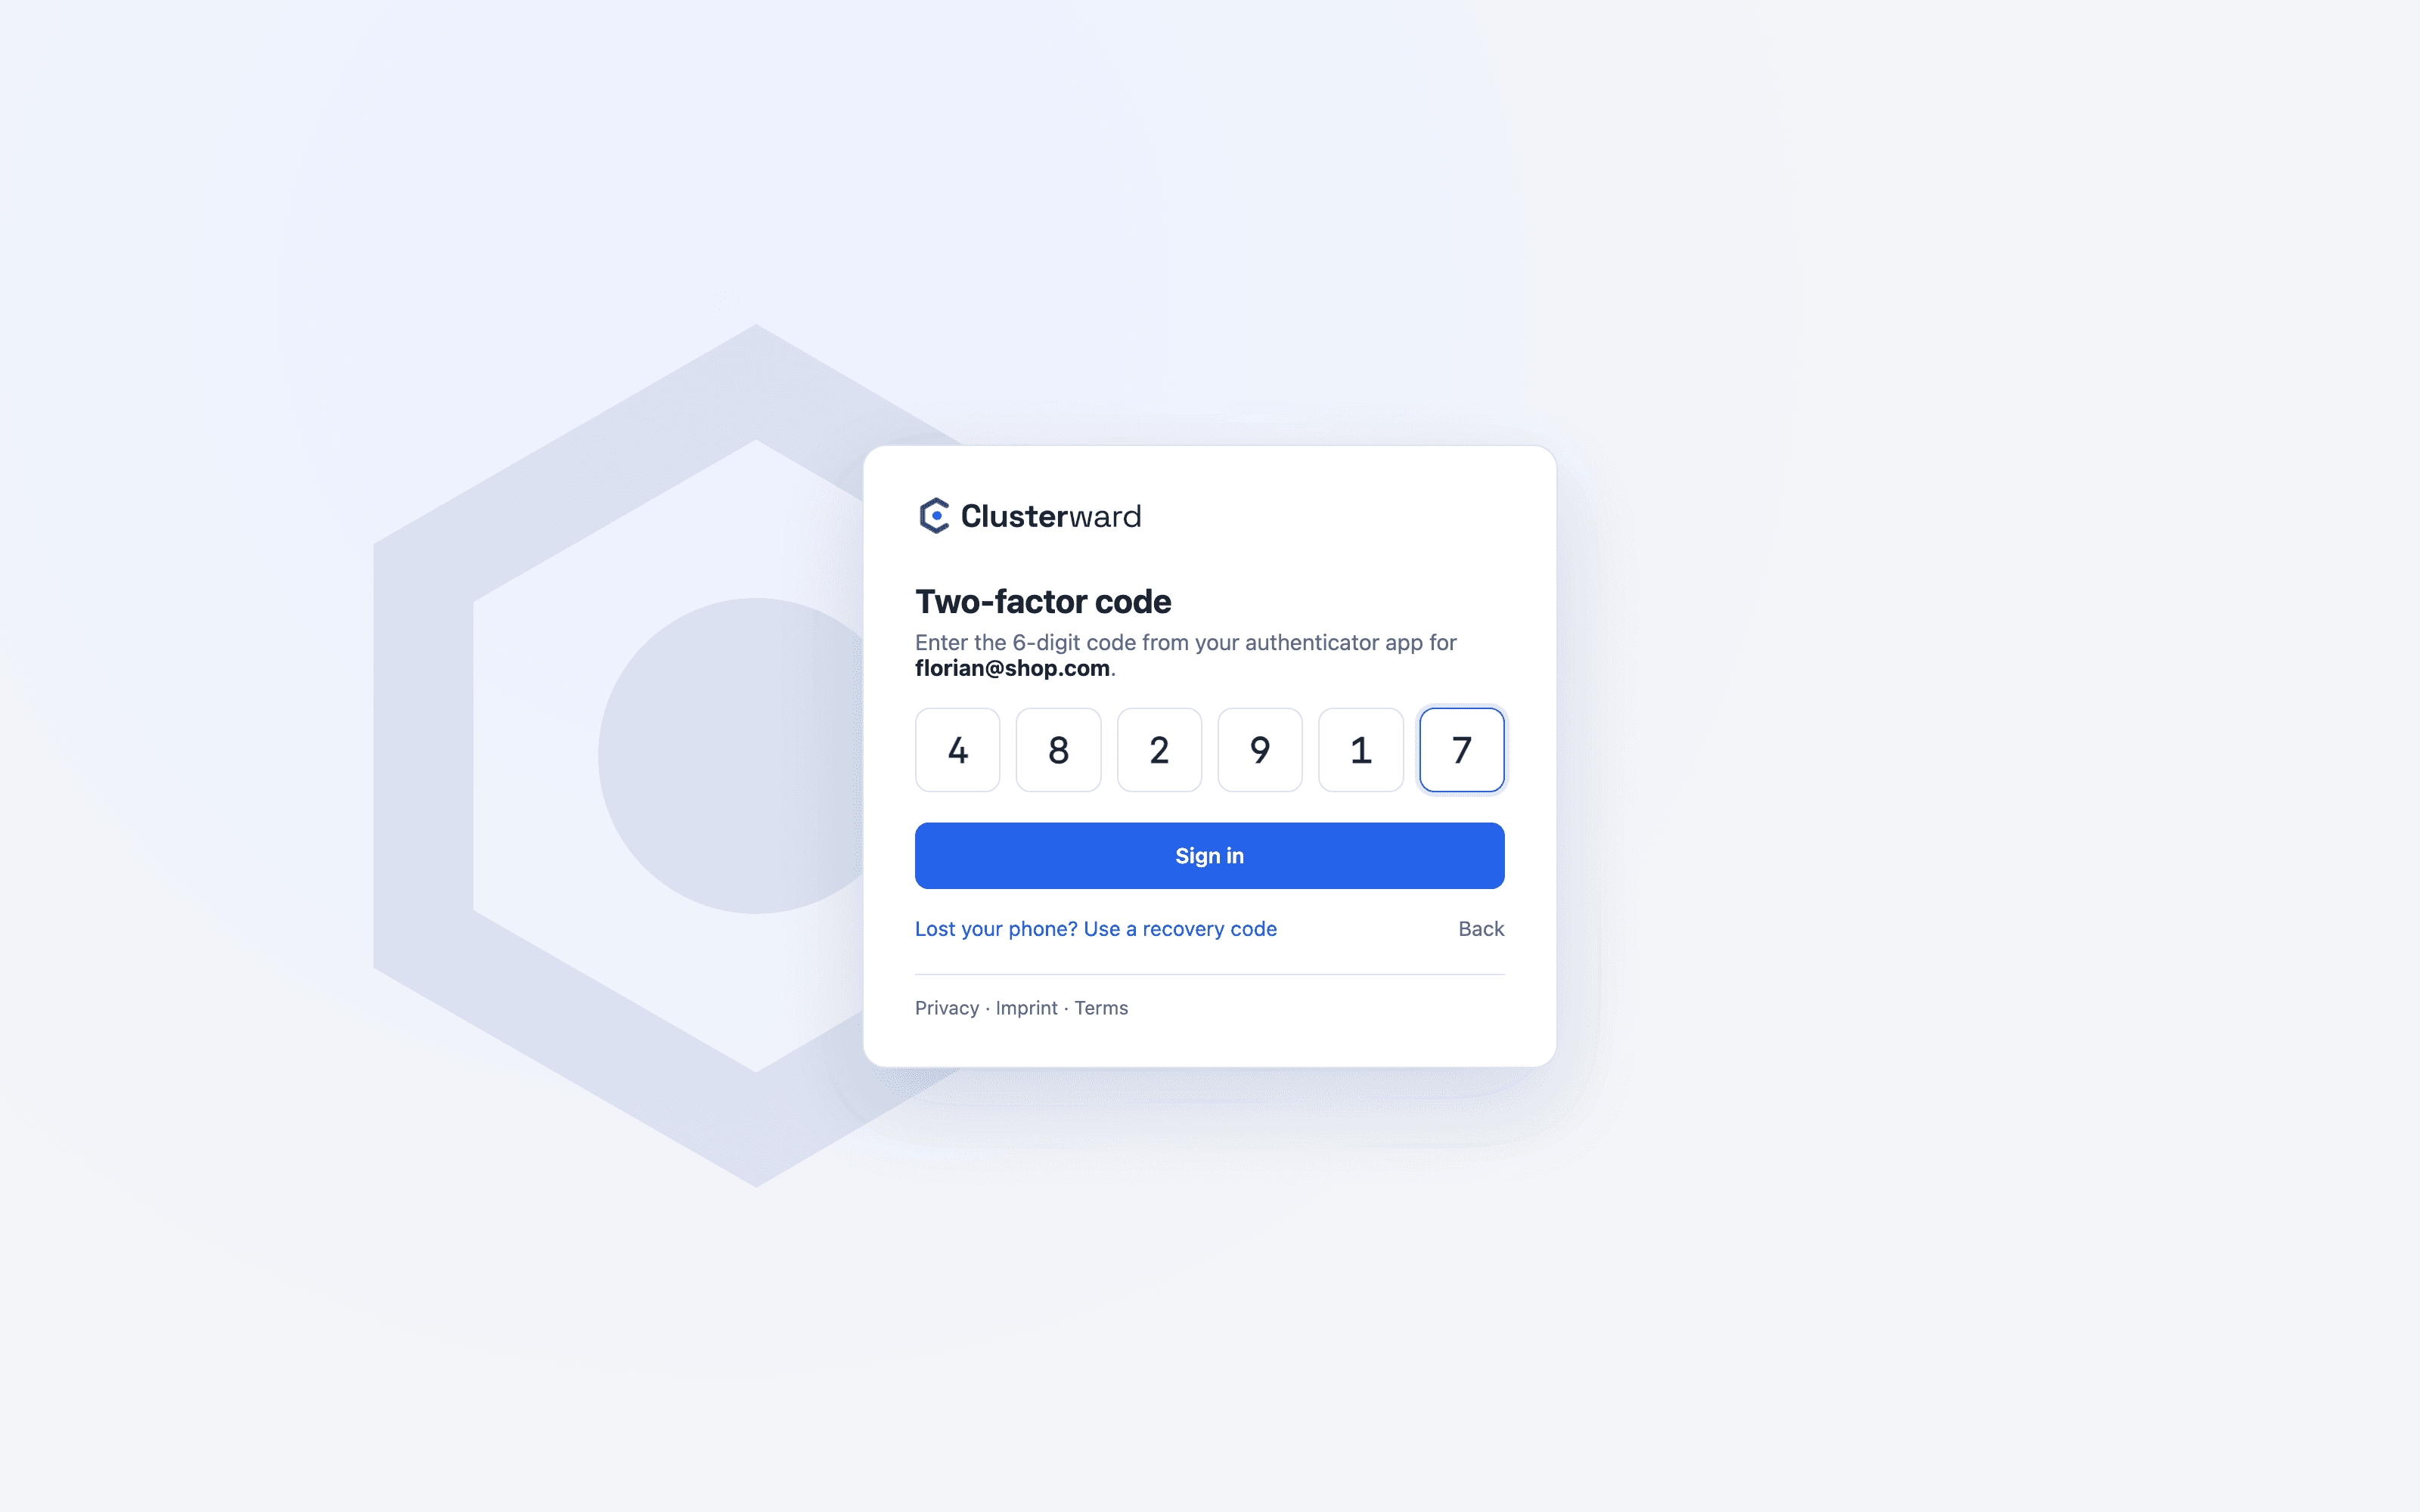
In the demo, we look at your use case: which applications, how many customers, which databases. Then we set up your workspace: its own control plane database, its own data key, its own backup bucket and your address under clusterward.app. Your first administrator receives an email invitation, sets their own password and sets up mandatory 2FA with an authenticator app on first sign-in. A checklist with the next steps is then waiting on the dashboard.

What you do

  • Book a demo

    Thirty minutes, live on your use case, with your questions about operations and pricing.

  • Receive your workspace

    Address, invitation for the first administrator, a thirty-day trial with two clusters.

  • Set up 2FA

    On first sign-in, with any TOTP app; without a second factor, there’s no access.

Signing in to the cockpit: after the password, the TOTP code from the authenticator app
Simplified view in the Clusterward cockpit: sign-in with a two-factor code
Illustration: a simplified view. The product shows more details and options.
Step 2 · 5 minutes

Connect your Scaleway project

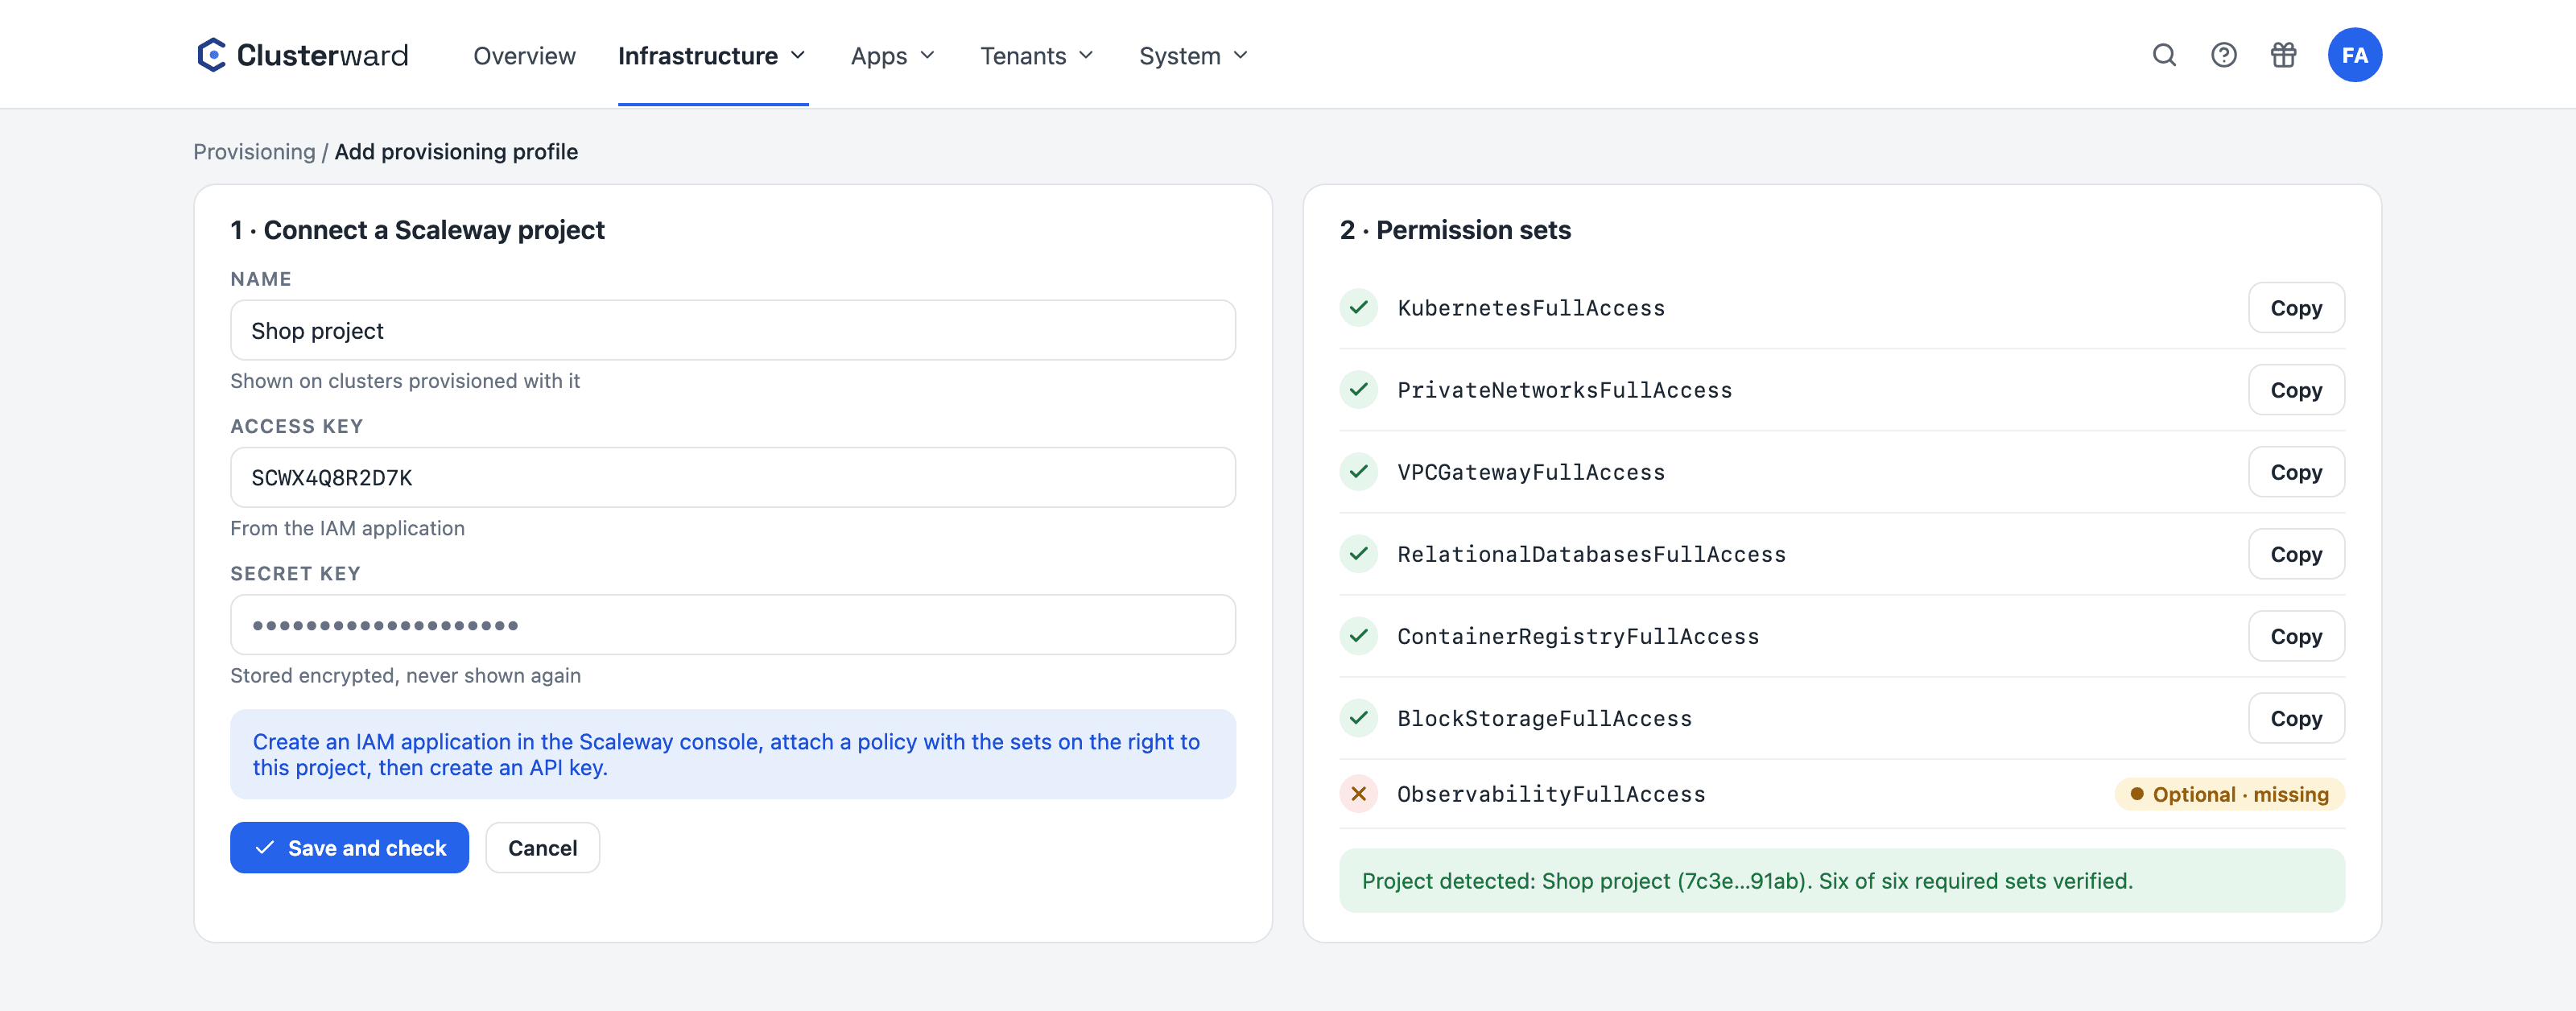
Under Infrastructure → Provisioning, you create a provisioning profile: name, project ID and the project’s IAM key. Clusterward checks the key against Scaleway immediately, every permission on its own, refuses it when a required permission is missing, stores it encrypted and never displays it again. “Test” reports per product what the key is allowed to do and fetches the project name from the console. During setup, the cockpit guides you through the IAM application and permission sets and checks each set individually. If a permission is missing, you see it here – not halfway through provisioning.

What you do

  • Create an IAM application

    In the Scaleway console under IAM, with the policies from the table below, for this project only.

  • Generate an API key

    Copy the access key and secret key; Scaleway shows the secret only once.

  • Save and test the profile

    The cockpit shows the permissions per product; Private Networks is a separate set.

Creating a provisioning profile: enter the key, and every permission set is checked
Simplified view in the Clusterward cockpit: creating a provisioning profile with a permissions check
Illustration: a simplified view. The product shows more details and options.
Step 3 · 10 to 15 minutes

Create or connect a cluster

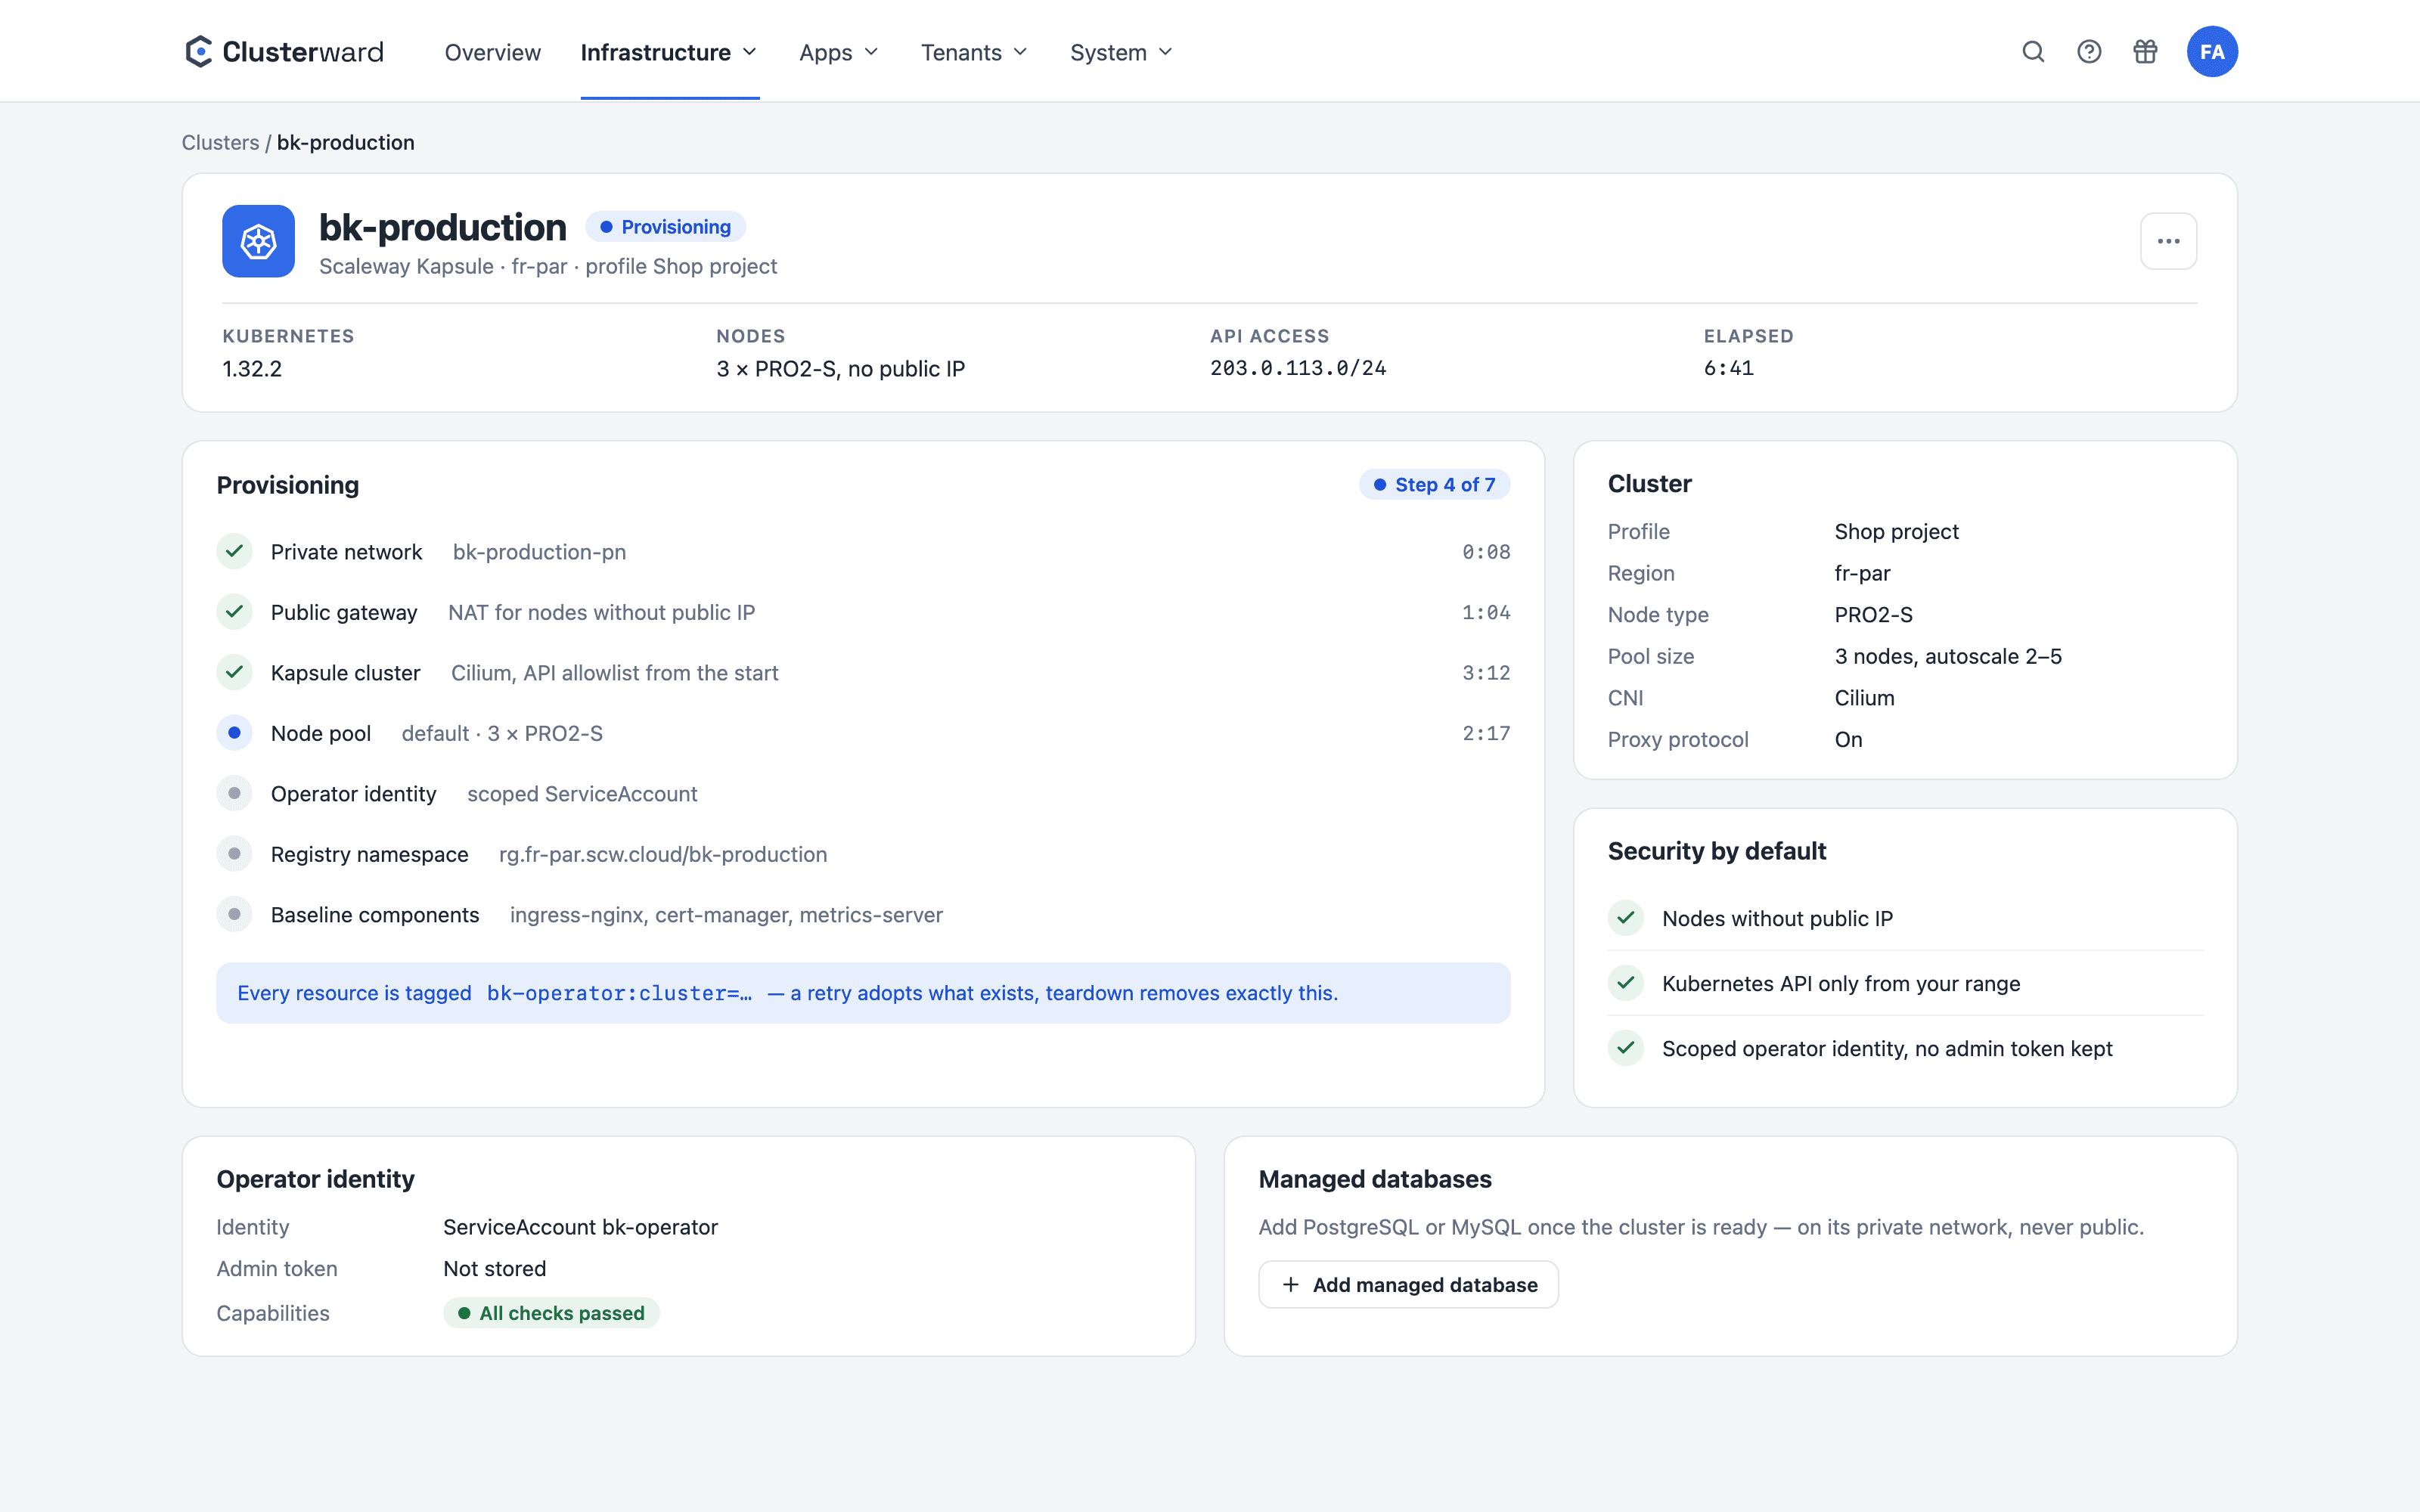
The wizard under Clusters → Provision asks for the profile, region, node type, number of nodes and the address range allowed to reach the Kubernetes API; “Add my IP” enters your current address. Clusterward creates the Private Network, Public Gateway, cluster and node pool, installs ingress-nginx with proxy protocol, cert-manager, metrics-server and Reflector, creates a private registry and swaps the admin token for a restricted identity. The tracker shows every step with its duration. If you already have a Kapsule cluster, import its kubeconfig instead.

What you do

  • Provision

    Region Paris or Amsterdam, node type, count, API address range. Proxy protocol is preset.

  • Or connect

    Paste the kubeconfig; the token is verified with a read request and stored encrypted.

  • Check the status

    The cluster page shows nodes, pods, utilization, add-ons with their versions and the load balancer.

Provisioning tracker: network, cluster, node pool, access, base components, each with its duration
Simplified view in the Clusterward cockpit: cluster provisioning
Illustration: a simplified view. The product shows more details and options.
Step 4 · 5 minutes

Create the application and build

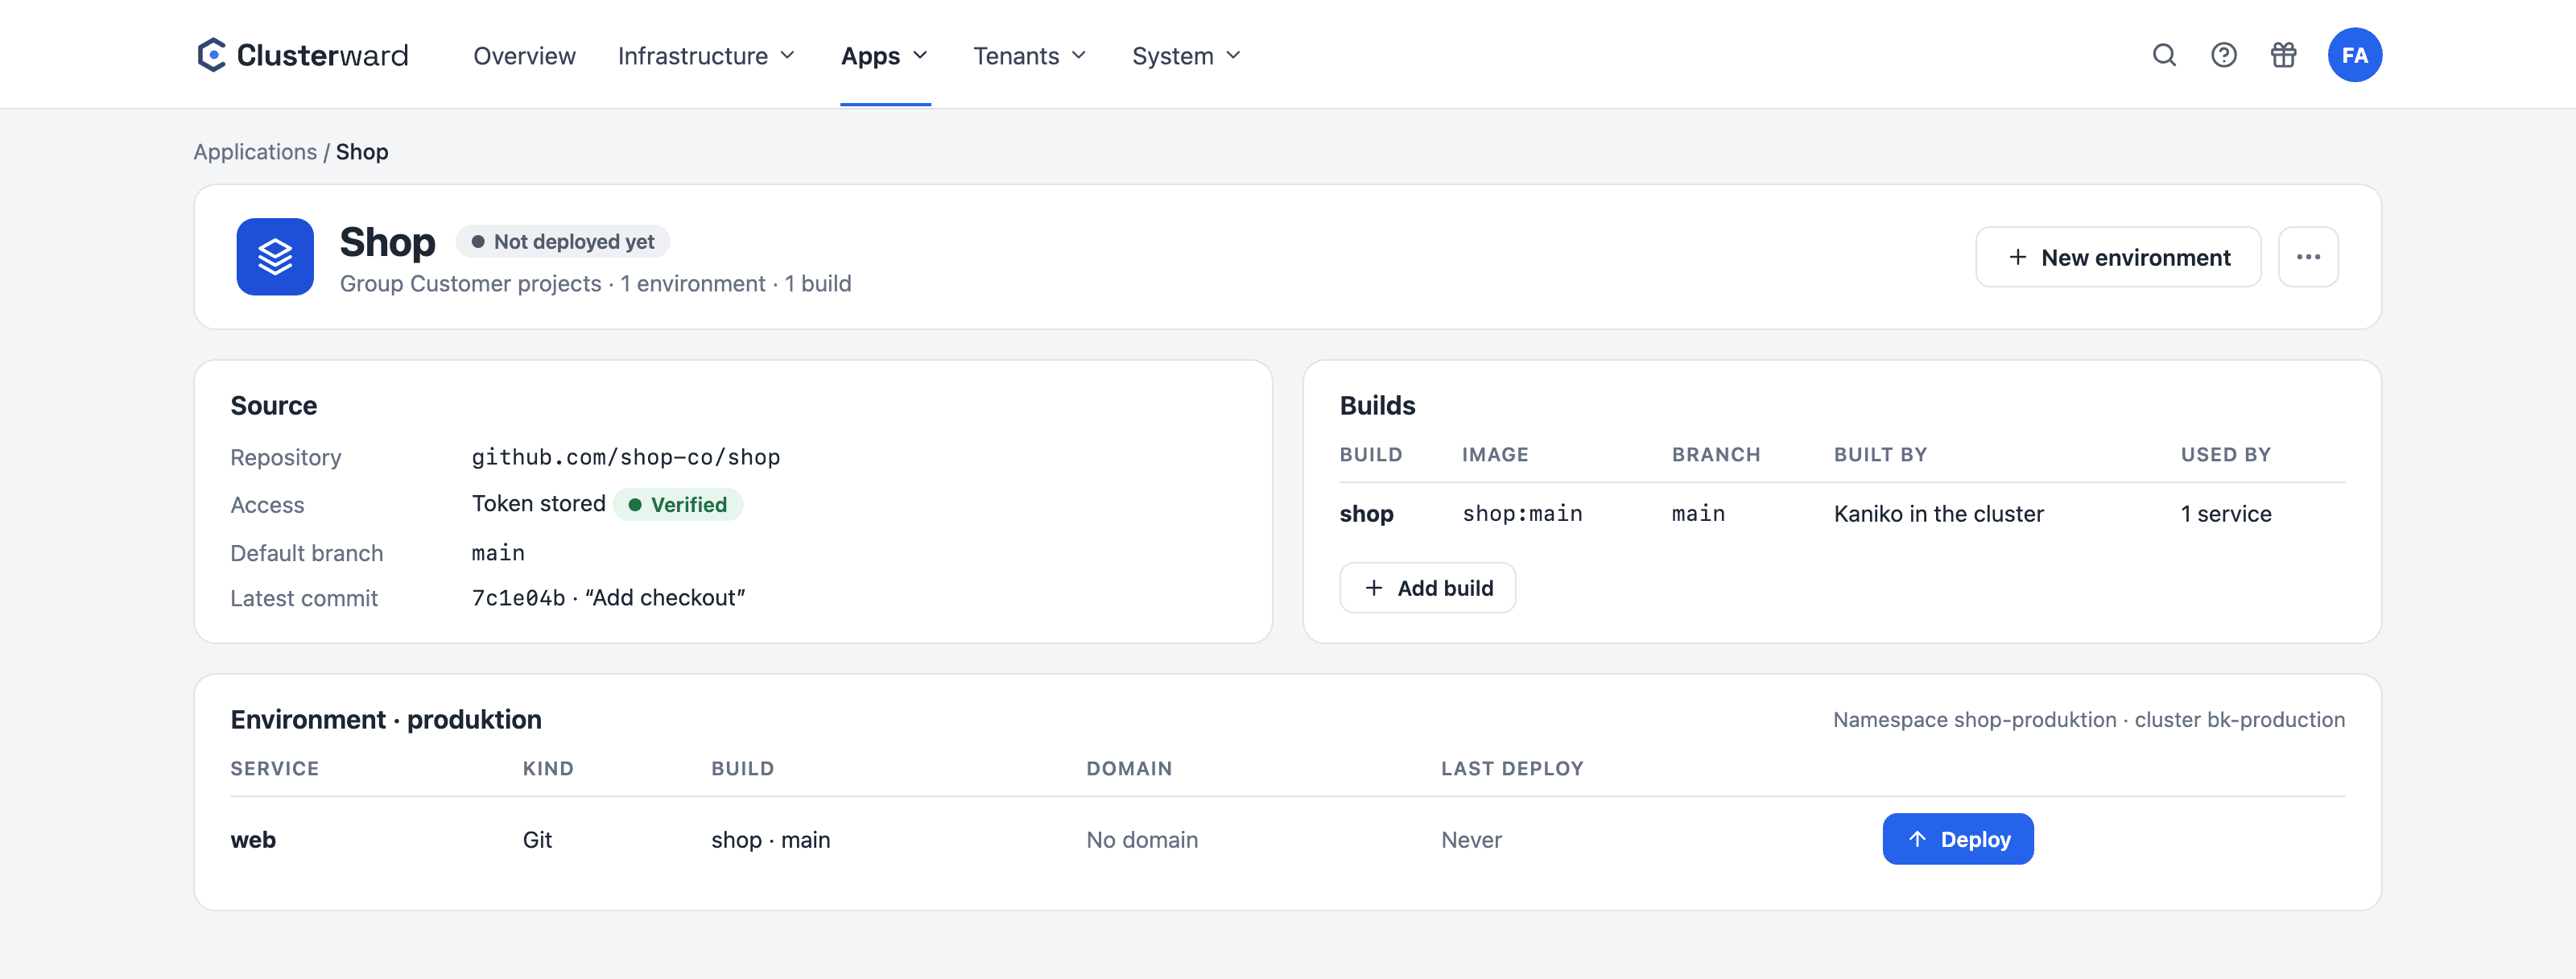
Under Applications, you create a project and a build for it: repository, branch, path to the Dockerfile, image name and tag, and the build source – Kaniko in the cluster or GitHub Actions. For a private repository, you store an access token, encrypted and write-only. Then an environment on the cluster, such as “production”, and in it a service of type Application that points to the build. Environment variables go into the encrypted editor or come from a template.

What you do

  • Define the build

    Branch, Dockerfile, image name; the name is derived once from the application name and stays fixed.

  • Environment and service

    An environment is a namespace on exactly one cluster; the service gets a port, resources and scaling.

  • Set variables

    In the editor or via a template; multi-line values such as keys stay intact.

Application page: source, builds and the service row of the “production” environment before the first rollout
Simplified view in the Clusterward cockpit: application page before the first rollout
Illustration: a simplified view. The product shows more details and options.
Step 5 · 5 minutes

Database and domain

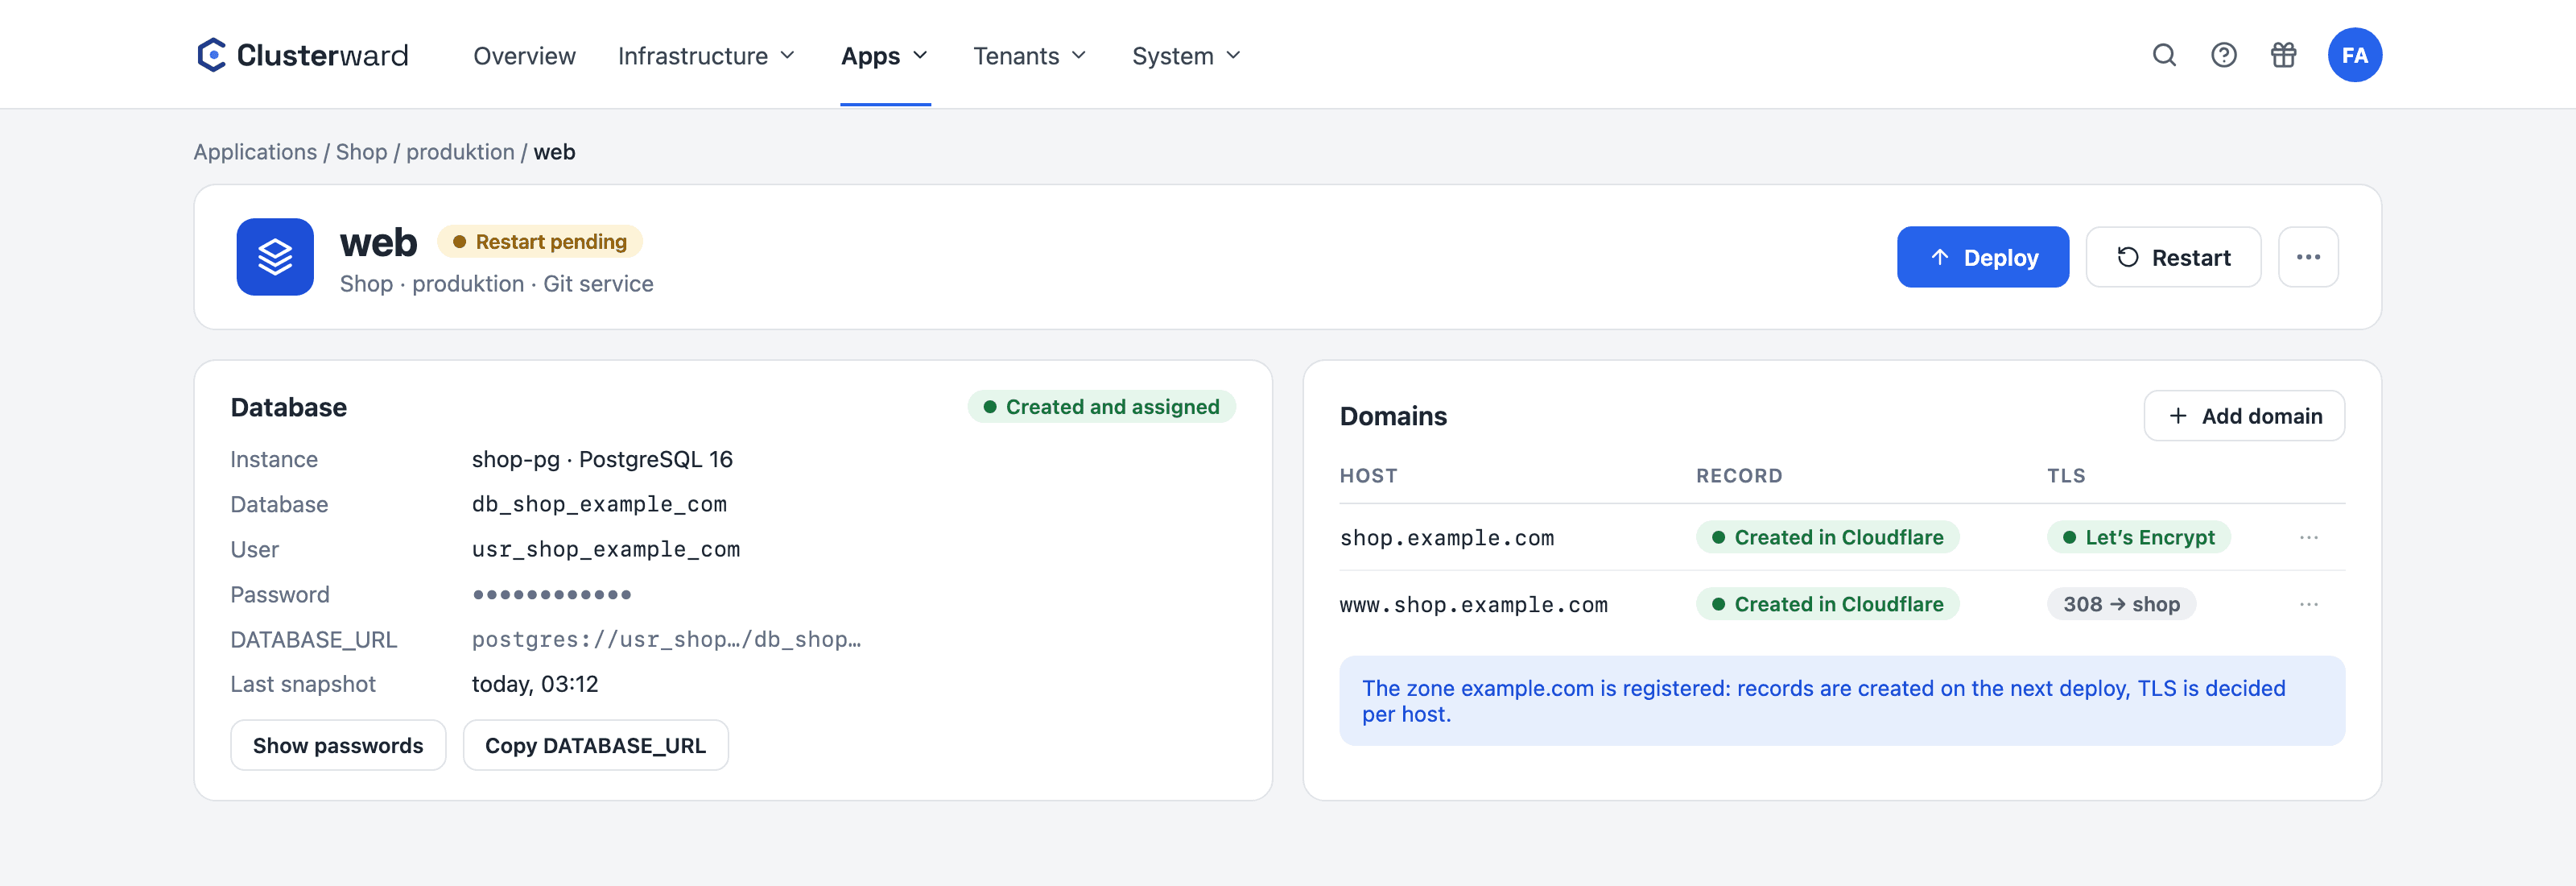
If the application needs a database, first provision a managed instance on the cluster page – PostgreSQL or MySQL, with a private endpoint only. On the service page, “Create database” then creates the database, role and password in one step, already assigned; you copy the connection details into the variables. For the domain, enter the host on the Domains card: if it’s in a registered Cloudflare zone, the record is created automatically; otherwise you create it yourself. The TLS strategy stays on “auto”.

What you do

  • Provision an instance

    Choose the engine, name and the cluster’s network; the instance never has a public endpoint.

  • Database on the service

    Name derived from the domain, password generated, connection details ready to copy.

  • Enter the host

    Register the Cloudflare zone under DNS first; then the record is created on its own.

Service page: Database card with connection details, Domains card with host, record status and TLS decision
Simplified view in the Clusterward cockpit: database and domains of a service
Illustration: a simplified view. The product shows more details and options.
Step 6 · 5 minutes

Deploy, check, set up alerts

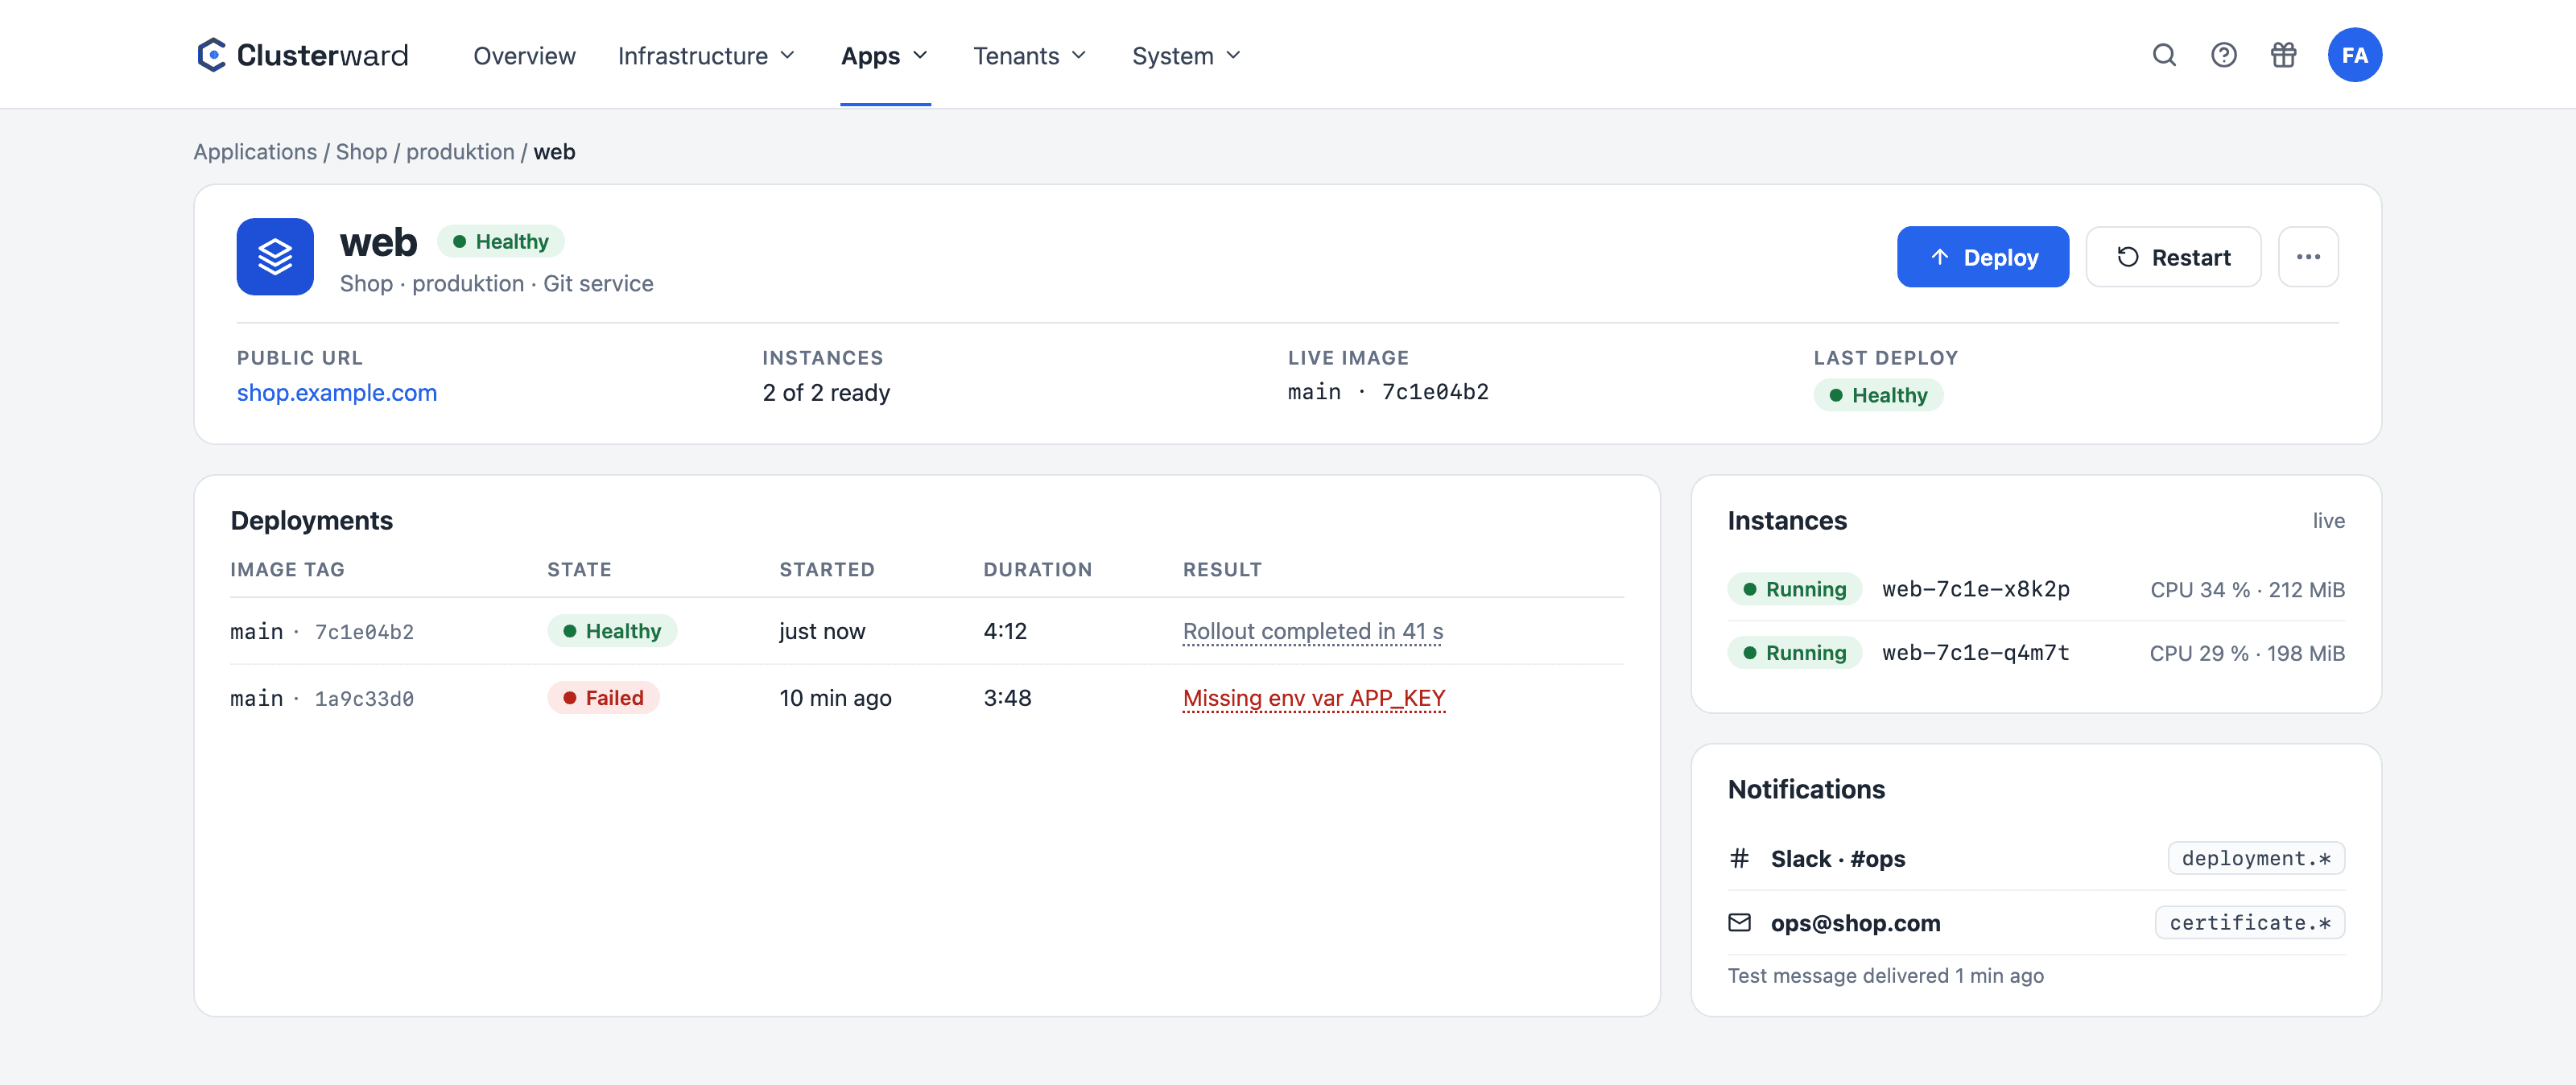
“Deploy” starts the build and rollout in the background; the deployment row shows build, registry check, rollout and health check. As soon as the pods are ready and the certificate is issued, the host responds. The Instances card shows pods with utilization and logs. Finally, under System → Notifications, you create a Slack, Teams or email channel and subscribe to failed deployments, unhealthy pods and expiring certificates.

What you do

  • Trigger a deploy

    Immediate response, progress in the deployment row; you can cancel while the build is running.

  • Open the host

    Certificate via Let’s Encrypt within minutes; behind the Cloudflare proxy, immediately.

  • Create a channel

    “Send test” checks delivery; alerts arrive once per event, with an all-clear.

Deployment history with durations, below it the instances with CPU and memory, and the notification channel
Simplified view in the Clusterward cockpit: deploy history, instances and notification channel
Illustration: a simplified view. The product shows more details and options.
Scaleway IAM

Provisioning profile permissions

The profile’s IAM application needs these policies. The first seven are required and apply to the one project, the rest are optional; you grant ProjectReadOnly and IAMManager at the organization level. “Test” in the cockpit shows per product whether the key is sufficient. Two pitfalls from real-world operations: VPC does not cover Private Networks, and without Observability the dashboard shows no database metrics. For Object Storage and Secret Manager, better enter keys of their own.

ProductPolicyUsed for
KubernetesKubernetesFullAccessClusters, node pools, API access list
VPCVPCFullAccessThe VPC the private network lives in
Private NetworksPrivateNetworksFullAccessSeparate set, not included in VPC
Public GatewayVPCGatewayFullAccessOutbound access for nodes without a public IP
IPAMIPAMFullAccessAddresses on the private network for nodes and databases
Managed DatabasesRelationalDatabasesFullAccessInstances, databases, users, backups
Container RegistryContainerRegistryFullAccessRegistry for your images, pulled by the nodes
Block StorageBlockStorageFullAccessOptional: volume snapshots and restores
ObservabilityObservabilityFullAccessOptional: database metrics on the dashboard
Secret ManagerSecretManagerFullAccessOptional: only if the key also serves a secret store
ProjectProjectReadOnlyOptional, organization: project name in the cockpit
IAMIAMManagerOptional, organization: a registry-only push key per cluster

Have a new cluster created

The wizard creates the network, gateway, cluster and pool secure by default: nodes without public IPs, API access only from your address range, base components in tested versions. Every resource is tagged with the cluster ID, an aborted run can be retried, and teardown removes exactly what was created.

Go to Cluster provisioning

Connect an existing cluster

An existing Kapsule cluster is registered via its kubeconfig. Clusterward verifies the token, stores it encrypted and initially only reads. The setup card detects add-ons that are already running, along with their versions; you mint the restricted operator identity with one click. Teardown stays locked for connected clusters.

Migrating existing setups
After the first deployment

What’s next

With the first service, the framework is in place. More environments such as staging are set up in minutes, colleagues get roles scoped to applications, and if you roll out the same stack for many customers, you describe it once as a tenant pipeline.

Persistent files belong on volumes with snapshots, and later you maintain the Kubernetes version and add-ons via cluster updates. Terms that were new in this guide are explained in the glossary.

Once the first application is running: Logs & monitoring shows logs, utilization and uptime checks.

A ready-made application to try out: WordPress from the app catalog.

FAQ

Frequently asked questions about getting started

  • Not to get started. This guide works without kubectl: the cluster, application, database and domain are all created in the cockpit. Kubernetes knowledge helps later when reading logs and understanding why a pod won’t start; the Instances card shows both in the cockpit.

Can’t find your question? Write to us – we usually reply on the same business day.

Ask a question

Prefer to get started together?

In the demo, we go through these six steps on your Scaleway project and set up your workspace right away.